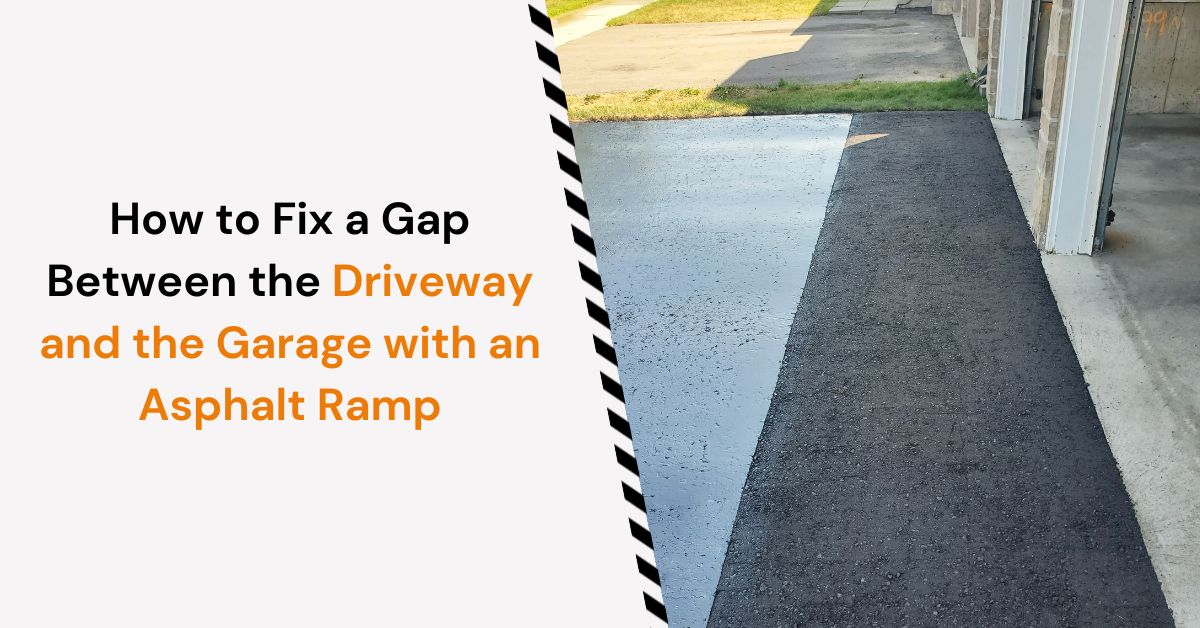
That small driveway gap between your asphalt and garage floor might not look like much, but it can quickly turn into a bigger issue. From stubbed toes and snow buildup to rainwater seeping into the garage, this seemingly minor dip is often the first sign of settling, erosion, or drainage trouble. The good news? You don’t need a full driveway replacement to fix it.
In this guide, you’ll learn how to build a strong, seamless asphalt ramp that not only eliminates the gap but also helps protect your driveway’s edges, extend your surface life, and prevent future asphalt cracking. Whether you’re looking for a smoother entrance or real protection for your asphalt driveway, this is the fix every homeowner should know.
Let’s walk through it.
Why Does the Driveway and Garage Gap Exist?
If your home’s in Toronto or anywhere with four-season weather, you’ve likely seen this before. The driveway settles over time, while the garage floor stays put. The result is a gap that grows every winter as freeze-thaw cycles, poor drainage, or shifting soil pull the two surfaces further apart.
Ignoring it doesn’t just make pulling in annoying, it exposes the edge of your driveway to water penetration, cracking, and even heaving. That’s when things get costly. If you’re already seeing signs of damage along the edges or joints, it’s a smart move to repair and fill driveway cracks early before they spread and weaken the entire surface.
The Tools You’ll Need For Filling the Driveway Gap
Here’s what you’ll want to gather before getting started. You may have a few of these lying around the garage already.
- 2 to 4 bags of cold patch asphalt (depending on the size of the gap)
- A sturdy broom and a leaf blower
- Masking tape
- Utility knife or flat shovel
- A propane torch (with tank)
- One clean 2×4 (used for shaping)
- Hand tamper
- Rag and a small container of gasoline
- Gloves
This isn’t fancy gear, it’s just the right gear. And when used in the right order, it’ll give you a professional-grade result.

Step-by-Step: How to Install an Asphalt Ramp To Fix the Driveway Gap
Step 1: Clean Like You Mean It
Start by sweeping every bit of dust and debris away from the gap. Then hit it with a leaf blower to get into the corners. You want a dry, clean surface that the asphalt can stick to properly. If it’s damp, let it dry or speed things along with a heat gun.
Step 2: Protect What You Don’t Want to Stain
Mask off the edge of your garage floor, and if your siding or stairs are close by, protect those too. Just be careful not to tape over the gap or working surface; you want the asphalt to fully adhere to those edges.
Step 3: Pour the Asphalt
Cut open the first bag of cold patch and start filling the gap. Slightly overfill it to give yourself enough material to work with when shaping. If the gap is deep, build it in layers rather than dumping it all at once. This helps with better compaction and gives the ramp more strength.
Step 4: Shape the Ramp
Grab that 2×4 and start shaping. Your goal is a smooth transition that slopes gently from the garage down to the driveway. Don’t worry about perfection, focus on evenness, rounded edges, and a clean baseline so water drains away, not toward the garage.
You’ll want to take your time with this step of the asphalt paving service. Good shaping makes the difference between a solid, smooth entry and something that looks like a pile of patches.
Step 5: Apply Heat (Carefully)
Now warm the surface with a propane torch. This step activates the binding agents in the asphalt, helping everything fuse together and creating a more durable bond. Move steadily, don’t leave the flame in one spot too long, and keep it away from anything flammable nearby.
Step 6: Tamp It Down
Dip a rag in a bit of gasoline and rub it onto the bottom of your hand tamper. This stops the asphalt from sticking as you work it into place. First, tamp lightly to smooth things out, then go over it again with firm, even pressure to compact the material. You want a solid, locked-in ramp that’s flush with the garage and driveway.
How Long Does Asphalt Take to Cure?
Give it time. Even though cold patch sets quickly, you’ll want to avoid driving over it for 3 to 5 days. This allows the material to settle, harden, and bond to the surfaces beneath it.
And while it might be tempting to seal it right away, don’t. Give it a few months to weather and oxidize before applying any sealcoat. That’s how you protect the full lifespan of your repair. For more insight into how asphalt hardens over time, check out this expert explanation of asphalt oxidation.
Why This Fix Helps More Than Just the Gap
This isn’t just about smoother entry. By closing off that exposed edge and building a proper transition, you’re protecting your sealant life, improving drainage, and preventing water from getting where it doesn’t belong.
Driveway edges are one of the first places to crack, crumble, or shift, especially in a city like Toronto, where temperature swings are sharp. An asphalt ramp not only smooths out the ride, it acts like armour for the most vulnerable spot on your surface.
When DIY Isn’t Enough To Repair the Driveway Gap
Some gaps are just too wide or uneven for a quick fix. If your driveway is lifting or sinking dramatically, or the gap seems to come back every spring, no matter what you do, it might be time to bring in the pros.
At Asphalt Sealing, we’ve helped hundreds of homeowners across Toronto solve these exact issues with custom cold patch ramps, professional compaction, and long-term resurfacing options that stand up to Canadian weather. We don’t just fix the gap, we help prevent it from coming back.